[AWS + Spring] EB + ElastiCache Redis + Spring Boot 연동 (2)

이전 포스팅에선 Elasticache Redis Cluster를 생성하고 bastion host를 통해 EC2에서 연결까지 확인 해봤다.
이번 포스팅에선 Spring Boot에 연동 후 Beanstalk에 배포한 뒤 API 테스트를 진행 해볼 것이다.
본 포스팅은 Elastic Beanstalk + Aurora RDS 환경에서 테스트를 진행한다.
* 해당 Beanstalk 구축 및 RDS 구축 예제는 해당 링크 참고 *
Spring Boot 에선 Spring Data Redis를 통해서 Lettuce, Jedis라는 두 가지 오픈소스 Java 라이브러리를 사용할 수 있다.
이 2가지로 Redis에 접근할 수 있는데, Lettuce는 별도의 설정이 필요하지 않고, Jedis는 별도의 의존성이 필요하다.
또한 원래 Jedis 를 많이 사용했으나 여러 가지 단점(멀티 쓰레드 불안정, Pool 한계 등)과
Lettuce의 장점(Netty 기반 비동기 지원 가능) 때문에 Lettuce 로 추세가 넘어가고 있었다.
결국 Spring Boot 2.0 부터 Jedis가 기본 클라이언트에서 deprecated 되고 Lettuce가 탑재 되었다.
그리고 Spring Data Redis는 Redis를 사용하기 위한 2가지 접근 방식
RedisTemplate와 Redis Repository를 제공한다.
이 포스팅에선 Lettuce와 RedisTemplate를 사용할 것이다.
💡 Spring-Data-Redis
- 여러가지 Redis 드라이버(Jedis, Lettuce 등등)를 추상화하여 사용
- RedisTemplate를 이용하여 Redis 작업, 직렬화 작업 등의 여러 작업을 지원
💡 RedisTemplate
- RedisTemplate는 redis 서버에 redis 커맨드를 수행하기 위한 high-level-abstractions를 제공한다.
- RedisTemplate가 제공하는 Serialize, Deserialize로 String을 사용하는 StringRedisTemplate를 통해
redis 서버에 CRUD를 할 수 있는 operation interface를 제공한다.
💡 RedisRepository
- domain Objects를 Redis Hash 자료구조로 변환, secondary indexes, TTL 등을 적용할 수 있다.
📌 시작하기
pom.xml
<dependency>
    <groupId>org.springframework.boot</groupId>
    <artifactId>spring-boot-starter-data-redis</artifactId>
</dependency>
spring-data-redis dependency 추가
Endpoint 확인

Aws Elasticache > Redis Cluster > 엔드포인트 주소 확인
project-path/src/main/resource/application-develop.yml
server:
  port: 5000

spring:
  datasource:
    replication:
      driver-class-name: com.mysql.cj.jdbc.Driver
      username: 마스터계정
      password: 마스터계정 패스워드
      write:
        name: write
        url: jdbc:mysql://리전 클러스터(라이터 인스턴스) 엔드포인트:3306/test
      reads:
        - name: read1
          url: jdbc:mysql://리전 클러스터(리더 인스턴스) 엔드포인트:3306/test
  redis:
    lettuce:
      pool:
        max-active: 10
        max-idle: 10
        min-idle: 2
    port: 6379
    host: [Elasticache Redis Cluster Endpoint]
    password: password
  mvc:
    pathmatch:
      matching-strategy: ant_path_matcher

logging:
  level:
    root: info
    org:
      hibernate:
        SQL: debug
        type:
          descriptor:
            sql:
              BasicBinder: trace
      springframework:
        jdbc:
          core:
            JdbcTemplate: debug
            StatementCreatorUtils: trace
이 포스팅은 Aurora RDS를 기반으로 진행한다. Redis 설정 부분만 참고 하시면 된다.
host 주소에는 위에서 확인한 레디스 클러스터의 엔드포인트 주소를 적으면 된다.
Redis Configuration
import org.springframework.beans.factory.annotation.Value;
import org.springframework.context.annotation.Bean;
import org.springframework.context.annotation.Configuration;
import org.springframework.data.redis.connection.RedisConnectionFactory;
import org.springframework.data.redis.connection.RedisStandaloneConfiguration;
import org.springframework.data.redis.connection.lettuce.LettuceConnectionFactory;
import org.springframework.data.redis.core.RedisTemplate;
import org.springframework.data.redis.serializer.StringRedisSerializer;

@Configuration
public class RedisConfig {

    @Value("${spring.redis.host}")
    private String redisHost;

    @Value("${spring.redis.port}")
    private String redisPort;

    @Value("${spring.redis.password}")
    private String redisPassword;

    @Bean
    public RedisConnectionFactory redisConnectionFactory() {
        RedisStandaloneConfiguration redisStandaloneConfiguration = new RedisStandaloneConfiguration();
        redisStandaloneConfiguration.setHostName(redisHost);
        redisStandaloneConfiguration.setPort(Integer.parseInt(redisPort));
        redisStandaloneConfiguration.setPassword(redisPassword);
        return new LettuceConnectionFactory(redisStandaloneConfiguration);
    }

    @Bean
    public RedisTemplate<String, Object> redisTemplate() {
        RedisTemplate<String, Object> redisTemplate = new RedisTemplate<>();
        redisTemplate.setConnectionFactory(redisConnectionFactory());
        redisTemplate.setKeySerializer(new StringRedisSerializer());
        redisTemplate.setValueSerializer(new StringRedisSerializer());
        return redisTemplate;
    }
}
@Value Annotation으로 application-develop.yml에 적어둔 host, port, password 값을 얻어온다.
Redis Repository가 아닌 RedisTemplate를 사용할 것이기 때문에 StringRedisSerializer를 사용한다.
💡 RedisConnectionFactory
- RedisConnectionFactory는 새로운 Connection이나 이미 존재하는 Connection을 리턴한다.
- 예외 변환도 가능하며 예외 발생 시 SpringDataAccessException으로 전환한다.
- Jedis, Lettuce 등등 Redis-client를 선택해서 연결을 생성할 수 있다.
JsonComponent 생성
import com.fasterxml.jackson.databind.ObjectMapper;
import com.fasterxml.jackson.datatype.jsr310.JavaTimeModule;
import lombok.extern.slf4j.Slf4j;
import org.apache.commons.lang3.exception.ExceptionUtils;
import org.springframework.stereotype.Component;
import javax.annotation.PostConstruct;

@Slf4j
@Component
public class JsonComponent {

    private ObjectMapper objectMapper;

    @PostConstruct
    public void init() {
        objectMapper = new ObjectMapper().registerModule(new JavaTimeModule());
    }

    public String objectToJson(Object obj) {
        String jsonStr = "";
        try {
            jsonStr = objectMapper.writeValueAsString(obj);
        } catch (Exception e) {
            log.error(ExceptionUtils.getStackTrace(e));
            new RuntimeException("ParsingException", e);
        }
        return jsonStr;
    }

    public <T> T jsonToObject(String json, Class<T> clazz) {
        T obj = null;
        try {
            obj = objectMapper.readValue(json, clazz);
        } catch (Exception e) {
            log.error(ExceptionUtils.getStackTrace(e));
            new RuntimeException("ConvertException", e);
        }
        return obj;
    }
}
Java 8 date/time type `java.time.LocalDateTime` not supported by default: add Module "com.fasterxml.jackson.datatype:jackson-datatype-jsr310" to enable handling...
객체의 항목 중 LocalDateTime이 있는 항목의 값을 ObjectMapper를 써서 가져올 경우 위와 같은 에러가 발생한다.
Java 8에서 추가된 LocalDateTime 항목을 제대로 직렬화 또는 역직렬화를 못하기 때문이다.
위 컴포넌트는 jsr310 이슈를 해결 하기 위해 ObjectMapper에 JavaTimeModule을 추가하여 재정의 한 Component다.
objectToJson: object를 json으로 변환 시켜주는 메서드 (for set data)
jsonToObject: json을 T Class로 변환 시켜주는 메서드 (for get Data)
RedisComponent 생성
import lombok.RequiredArgsConstructor;
import lombok.extern.slf4j.Slf4j;
import org.apache.commons.lang3.StringUtils;
import org.springframework.data.redis.core.RedisTemplate;
import org.springframework.data.redis.core.ValueOperations;
import org.springframework.stereotype.Component;
import java.util.concurrent.TimeUnit;

@Slf4j
@RequiredArgsConstructor
@Component
public class RedisComponent {

    final RedisTemplate<String, String> redisTemplate;
    final JsonComponent jsonComponent;

    public <T> T getObjectByKey(String key, Class<T> clazz) {
        ValueOperations<String, String> vop = redisTemplate.opsForValue();
        String jsonString = vop.get(key);
        if (StringUtils.isNotEmpty(jsonString)) {
            return jsonComponent.jsonStringToObject(jsonString, clazz);
        } else {
            return null;
        }
    }

    public void setObjectByKey(String key, Object obj) {
        ValueOperations<String, String> vop = redisTemplate.opsForValue();
        vop.set(key, jsonComponent.objectToJsonString(obj));
        redisTemplate.expire(key, 7, TimeUnit.DAYS);
    }
}
Data를 쓰거나 얻을 수 있는 메서드를 재사용 하기 위해 만든 Redis Component다.
위에서 만든 JsonComponent로 Data Value를 컨트롤하고, RedisTemplate를 이용해
Redis에 데이터를 저장하거나 조회 할 수 있다.
* RedisTemplate에 expire() 메서드를 이용해 Expired Date를 설정할 수 있다.
TestController 생성
@RestController
@RequestMapping("/api/test")
@RequiredArgsConstructor
public class TestController {

    private final TestService service;

    @GetMapping
    public String get() {
    	return service.get();
    }
    @PostMapping
    public String create() {
        service.create();
        return "ok";
    }
}
테스트를 위한 간단한 Controller를 생성한다.
TestService 생성
import lombok.RequiredArgsConstructor;
import org.springframework.stereotype.Service;
import org.springframework.transaction.annotation.Transactional;

@Service
@Transactional(readOnly = true)
@RequiredArgsConstructor
public class TestService {

    private final RedisComponent redisComponent;

    public String get() {
        return redisComponent.getObjectByKey("test", String.class);
	}

    @Transactional
    public void create() {
        redisComponent.setObjectByKey("test", "Success Connection Test");
    }
}
단순 String을 생성하고 조회하는 Service를 생성한다.
RedisComponent는 JPA를 이용한 Entity도 다룰 수 있다.
본 포스팅은 테스트 목적이기 때문에 단순 String으로 테스트를 진행했지만, 꽤 유용하게 쓸 수 있는 컴포넌트다.
자, 이제 모든 설정과 구현이 끝났다. Elastic Beanstalk에 배포 하기 위해 Jar 패키징을 해보자.

Maven-Plugin으로 패키징해서 jar 파일을 생성한다.
Build가 성공적으로 끝나면 target/classes/{패키지명} 안에 projectName-0.0.1.jar 파일이 생성 된다.
다시 Aws Console로 이동해보자.
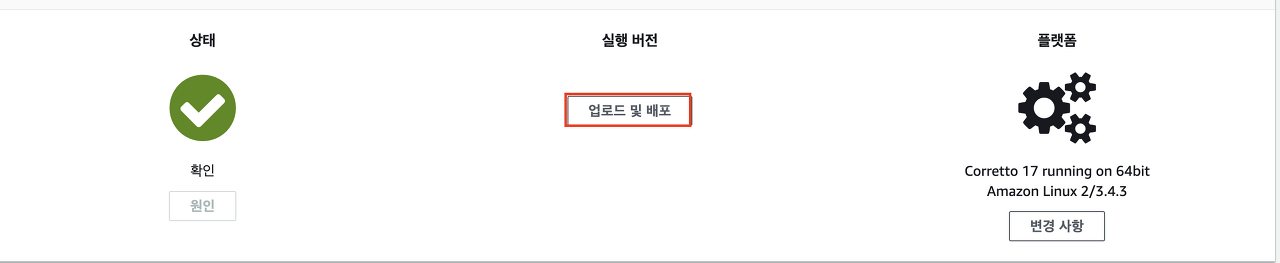
Elastic Beanstalk > 환경 > Test-env 페이지에서 '업로드 및 배포'를 클릭한다.

'파일 선택'을 클릭해서 생성한 프로젝트의 Jar 파일을 업로드하고 배포한다.
(Spring Active Profile은 develop인 상태)
배포 후 재기동이 완료 됐으면 API 요청을 보내보자.

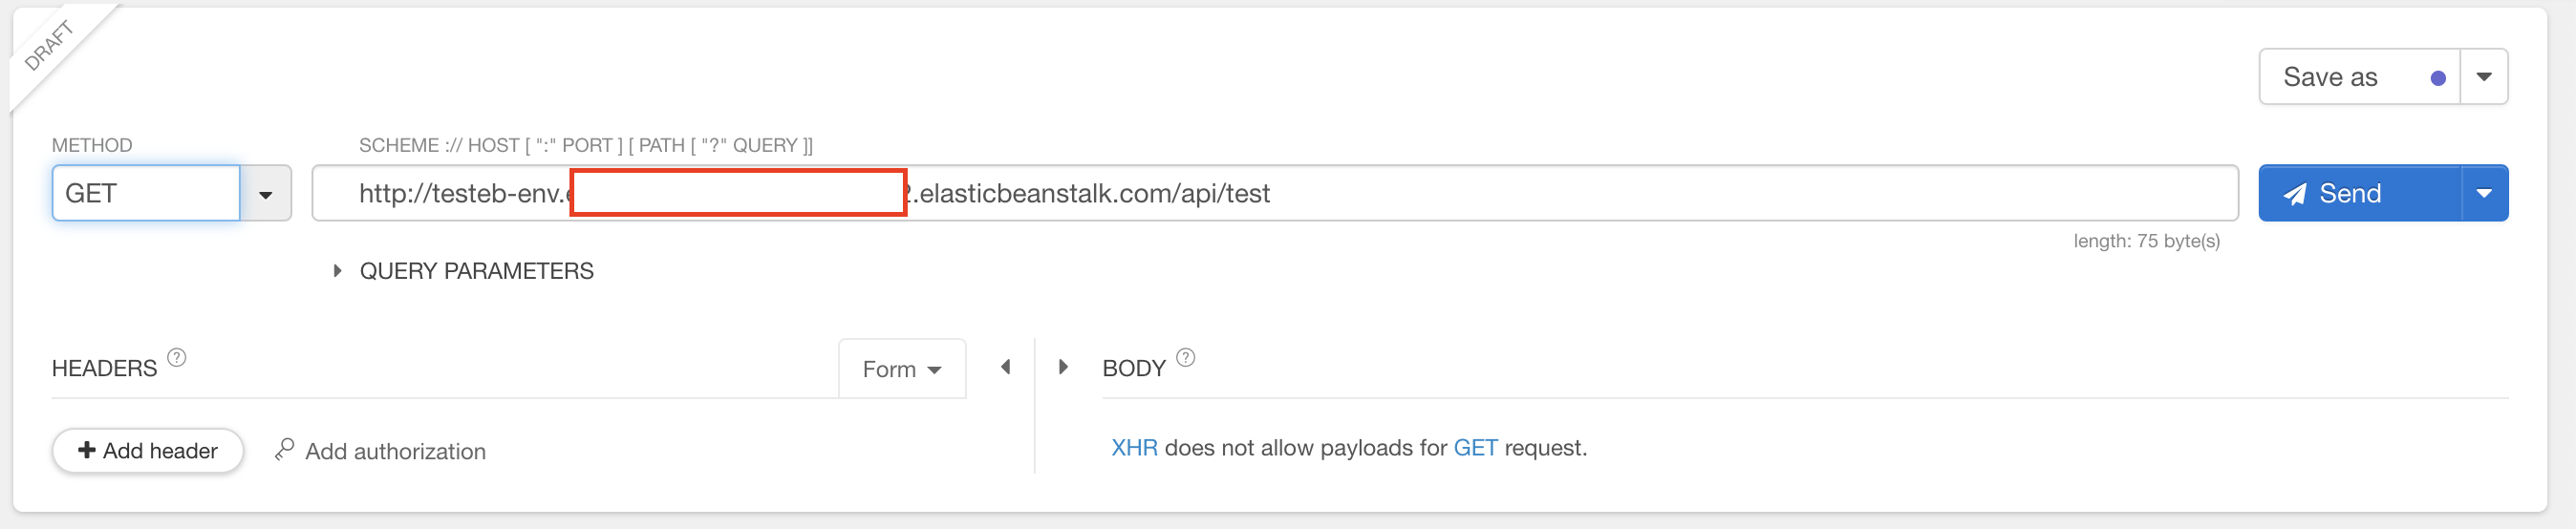
POST 요청으로 Data를 생성하고
GET 요청으로 Redis에서 Data를 성공적으로 조회 하는 것을 확인할 수 있다.